Comparing the Same Workbook
View Multiple Sheets of an Excel Workbook
Comparing the Same Workbook
A very handy feature of Excel is its ability to allow you to create a copy of a workbook and compare and work with the copy whilst simultaneously working with and viewing the original workbook. There are two ways in Excel that you can do this.
Creating a New Window
The first thing that needs to be done is to create another instance of the workbook you wish to compare. To do this, first open the workbook you wish to compare, then go to Window>New Window. This will force Excel to create an identical copy of your file. We will use Book1 as an example. The naming convention will change to be Book1:1 and Book1:2 once you create the new copy via Window>New Window.
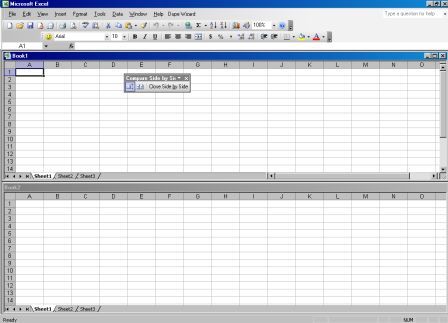
Compare Workbook Command **Note that this is only available in later versions of Excel. Now in Book 1:1, go to Window>Compare Side by Side with Book1:2 and you will see both workbooks displayed one on top of the other with the Compare toolbar also showing on your screen. Remember that any change you make in either copy of the same workbook will be shown in the other copy when you save.
The Compare Workbook toolbar has three buttons on it. The first button (called Synchronous Scrolling if you wave your mouse over it) when pressed in will ensure that both copies will move simultaneously as you scroll through them. The second button Reset Window Position will reset your workbooks to the position they were originally in before you Start ed to Compare. The third button Close Side by Side closes down the Compare option, as does the command Window>Close Side by Side, as does double clicking the Maximize button on either copies, or double clicking the blue title bar of either copy.
The only limitation with the Compare command is that it limits you to comparing two copies of the same workbook only.
Arranging the Workbook
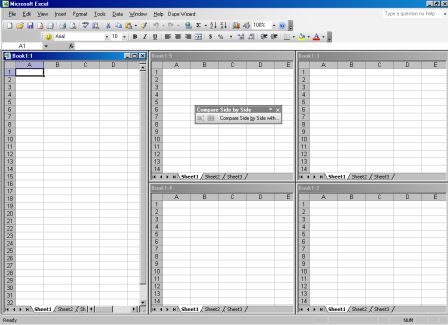
The Arrange option found under the Windows command works in a similar manner to the Compare command, except that it allows greater flexibility. The Arrange command allows you to work with multiple copies of the same workbook. Again using Book1 as an example, go to Window>New Window and create another copy of your workbook. Do it again another three times. You should now have Book1:1, Book 1:2, Book1:3, Book 1:4, Book1:5. Now go to Window>Arrange The Arrange Workbook dialog will pop up with four display options; Tiled, Horizontal, Vertical, Cascade. Notice also the option Windows of Active Workbook at the bottom of the dialog. Only check this if you have other workbooks open. Select one of the four display options (the following screen shot shows the tiled option) and click OK.
You can also show and use the Compare Side by Side toolbar by going to View>Toolbars>Customise and checking Compare Side by Side and clicking Close.
A quick way to close all copies of the workbook at once is to hold down the Shift key on your keyboard and select the File option from the worksheet menu bar. You will see that the option Close changes to Close All when the Shift key is held down. Select Close All to close all copies of the workbook at once. You will be prompted to save if you have made changes.
See also: Index to Excel VBA Code and Index to Excel Freebies and Lesson 1 - Excel Fundamentals and Index to how to… providing a range of solutions and Index to new resources and reference sheets
See also:
| Broken Line Excel Chart With Formulas for Linked Chart Data |
| Calculate a Person's Age in Excel |
| Converting, Text Case & Importing for Excel |
| Lookup Value & Return Corresponding Result |
Microsoft ® and Microsoft Excel ® are registered trademarks of Microsoft Corporation. OzGrid is in no way associated with Microsoft.
Click here to visit our Free 24/7 Excel/VBA Help Forum where there are thousands of posts you can get information from, or you can join the Forum and post your own questions.


